Update: How to Install Android 4.4 KitKat on Windows
Google recently announced Android 4.4 KitKat as the latest version of the Android OS . However there is still a lot of time left for the android 4.4 update to arrive on our smartphones. In the meanwhile lets tinker around a bit with Android 4.3. Android is definitely the most popular and dominating operating system on cell phones and tablets. But even then the latest version of android 4.3 is only available on a bunch of selected high end android smartphones only.
In case you don’t have these high end android smartphones, the only way for you to experience android 4.3 would be to root your phone and install a custom android 4.3 ROM. However Android 4.3 wont run on most low end android phones and disappointingly there’s no Android 4.3 ROM’s for these phones. However Android is not just limited to smartphones, how about installing and using Android 4.3 on your desktop computer ?
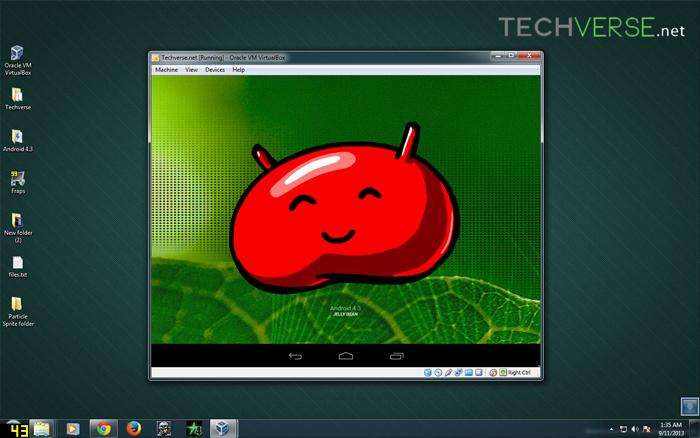
Yes, Android 4.3 can be installed and run on any computer running windows xp, windows vista , windows 7 or windows 8. This is all possible due to Android-x86 , an unofficial initiative to port Google’s Android mobile operating system to run on devices powered by Intel and AMD x86 processors. I have installed Android 4.3 on my computer and its running with all its bells and whistles. Now let me guide you through the process of installing Android 4.3 on your windows computer. Before we start lets make a list of things that we will be needing for installing Android 4.3 on your computer.
What we need ?
- Oracle Virtualbox
- The latest Android 4.3 image from Android-X86 project.
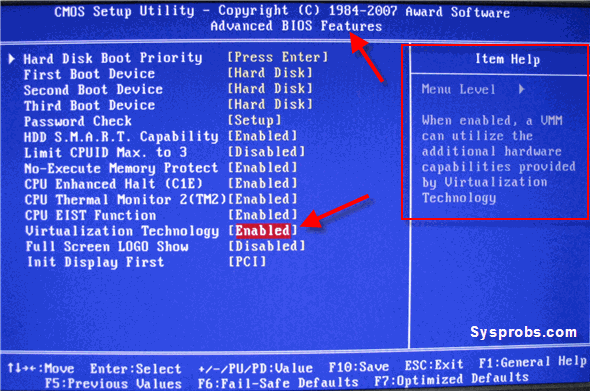
Note: You might need to enable virtualization in your computers BIOS . You can enable it from your PC’s bios as shown below.
Instructions to Install Android 4.3 on a windows computer
That all we need and definitely a windows computer with minimum 2 GB of ram is preferred . now let me guide you through the entire process . I am going to be very precise so this guide might be very long , pardon me for that . If you want a very detailed guide then do check this video tutorial .
- Step 1: Install and open Virtualbox .

- Step 2: Click on new and enter a name and the operating system details for the virtual machine . Select type as Linux and version as other and click next .

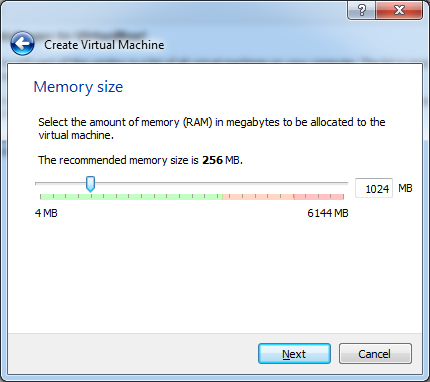
- Step 3: Enter the amount of ram you would like to allot for the virtual machine and click next . Android 4.3 requires at least 1Gb of ram but its not necessary .
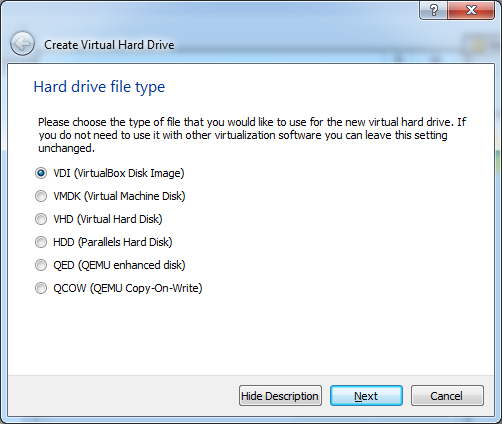
- Step 4: In the next window select “ Create a virtual hard disk “ and then select VDI .

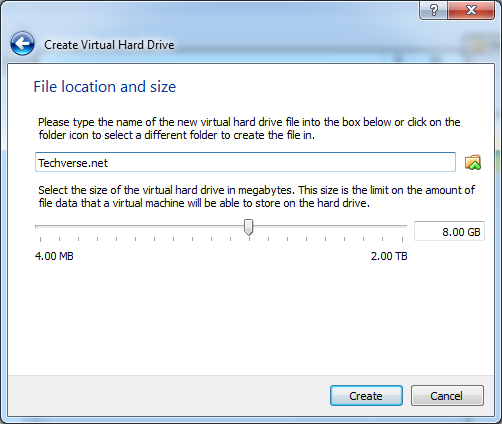
- Step 5: In the next window , According to your space requirement you can either select dynamically allocated or fixed size for your storage space . i selected fixed size because i want to allocate only 8Gb of storage space to android . in the next dialog box set the storage space for android according to your requirement .
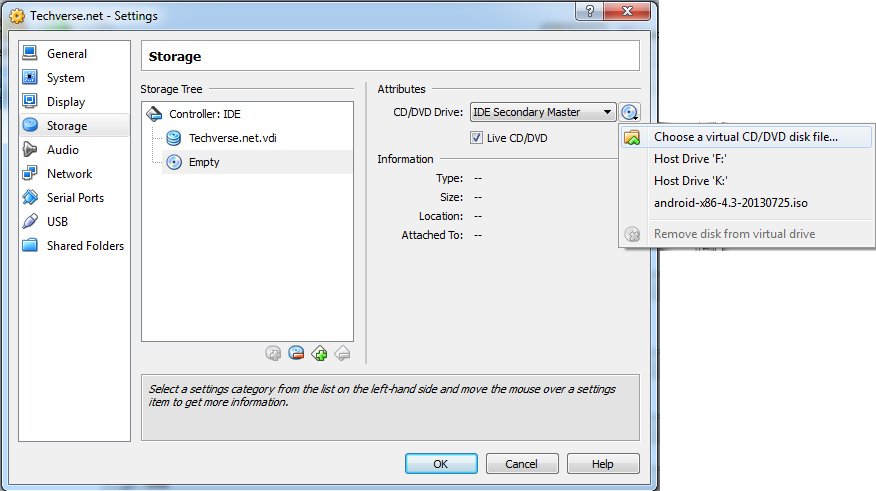
- Step 6: Your virtual machine is now set . all you need to do is add the location of the Android 4.3 image file . Click on the settings button in virtualbox . Under the settings navigate to storage , below the storage tree select empty and click on the disk image and select “ choose a virtual CD/DVD disk file “ and select the android 4.3 image . Check the Live CD/DVD box and click ok .
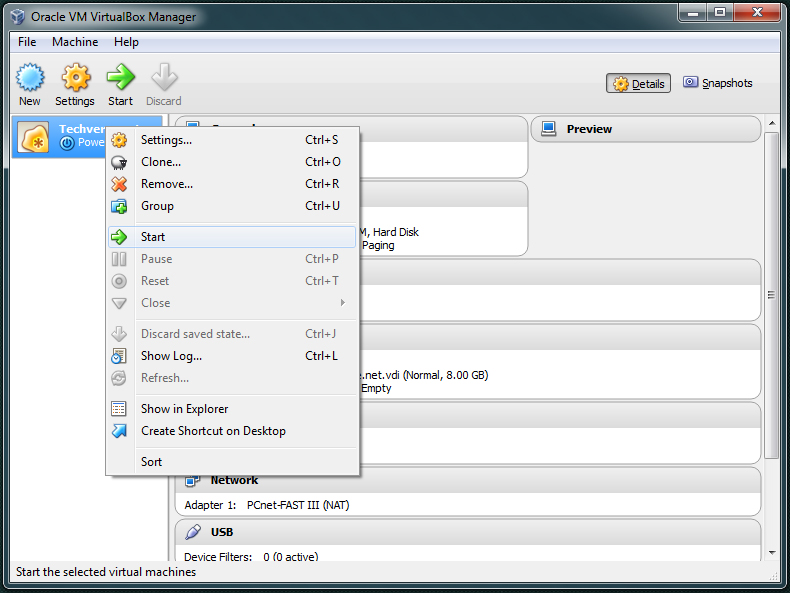
- Step 7: Double click on your virtual machine to start it and click OK for all the dialog boxes . Select Install Android-X86 to hard disk and click OK for all the dialog boxes .
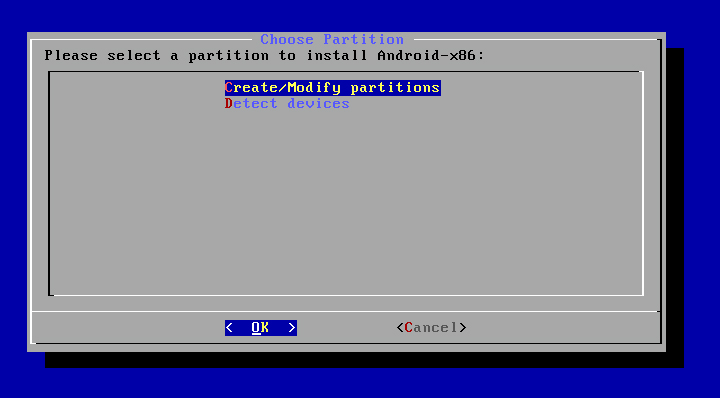
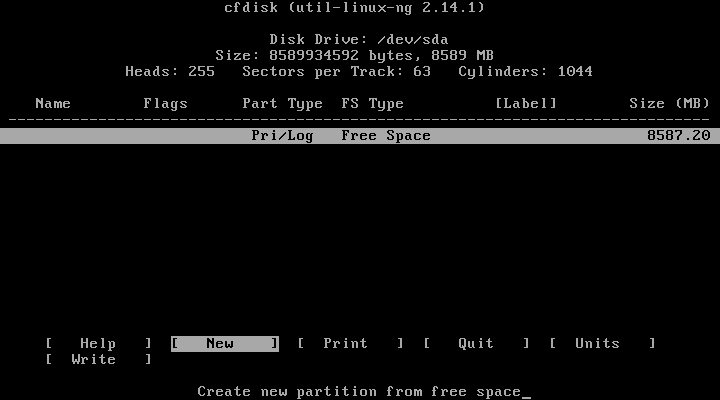
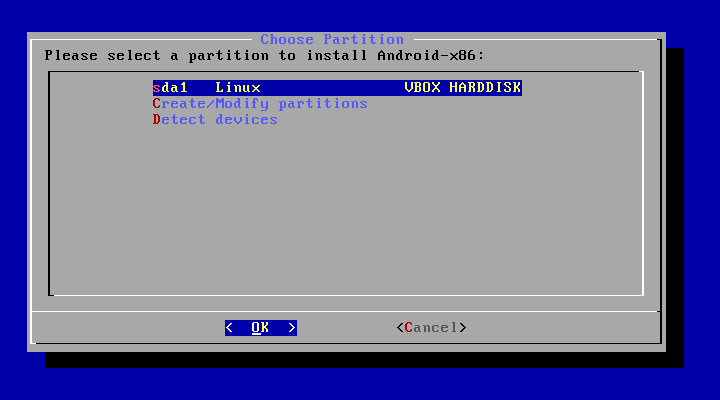
- Step 8: in the next window you have to create a partition for installing Android . The new partition will not mess up anything with your windows computer . From now onwards you have to use your up , down , left and right keys on your keyboard to Select “create/modify partitions “ and click OK .
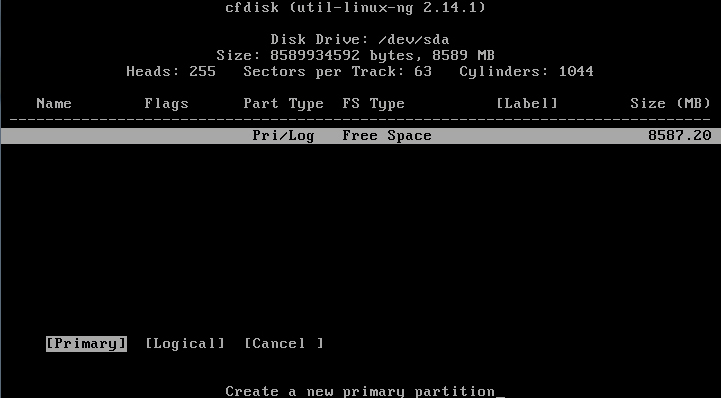
- Step 9: In the next windows select new > primary and then specify the size of the new partition .
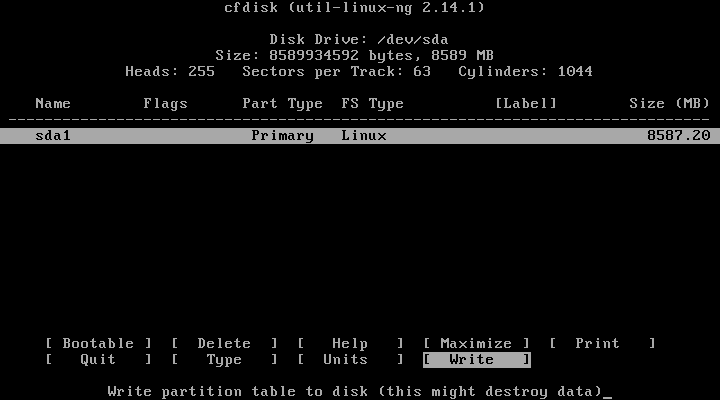
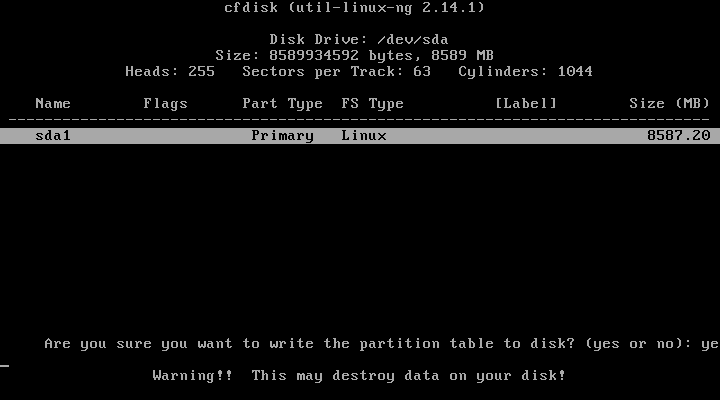
- Step 10: Your new partition has been created . Select write and press enter and type “yes “ and press enter again when prompted . In the next window select quit and press enter .
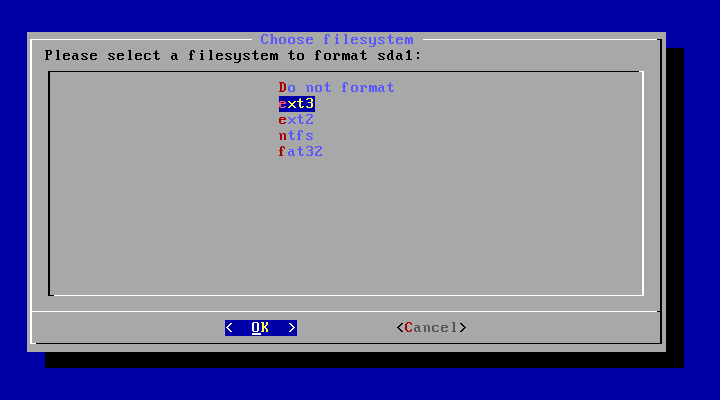
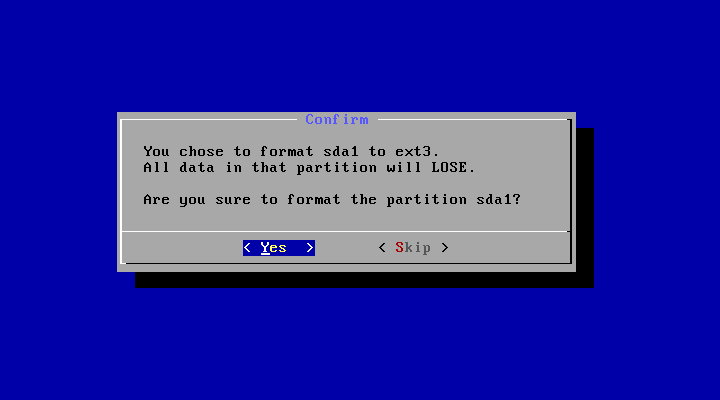
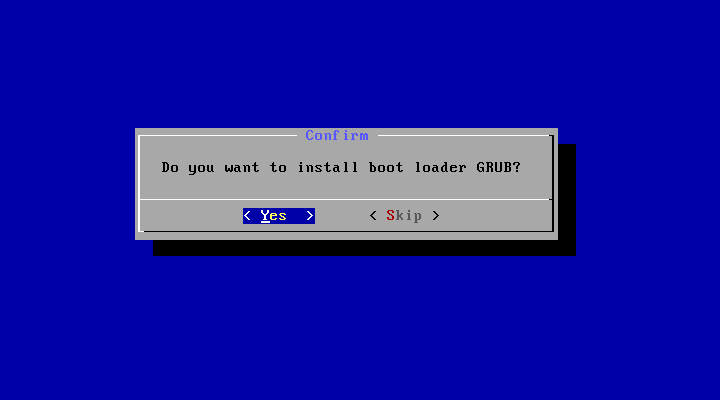
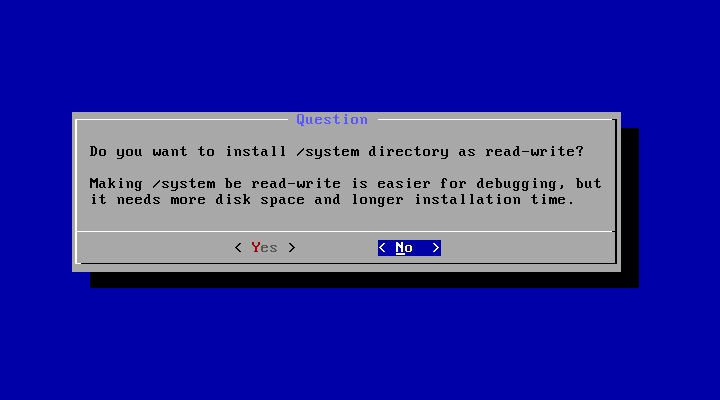
- Step 11 : In the next window select the Sda1 and press enter . select the et3 file system and press enter . When prompted to install grub loader select yes . Select now when prompted to make your system directory as read-write .
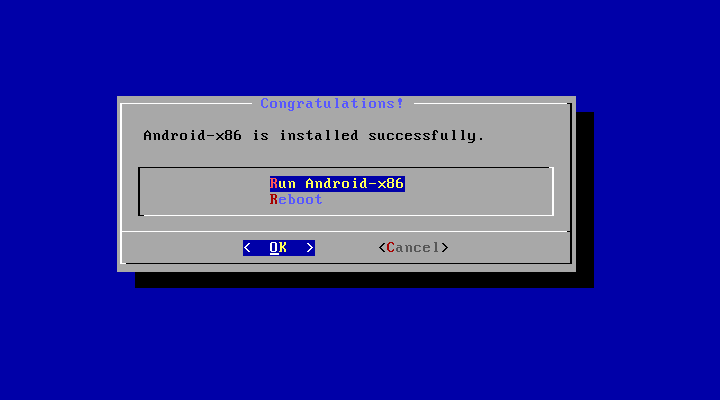
- Step 12: Now android 4.3 is successfully installed on your virtual machine . select Run Android 4.3 and press enter . click OK for any other dialog boxes that appear . You will now see the android loading screen .
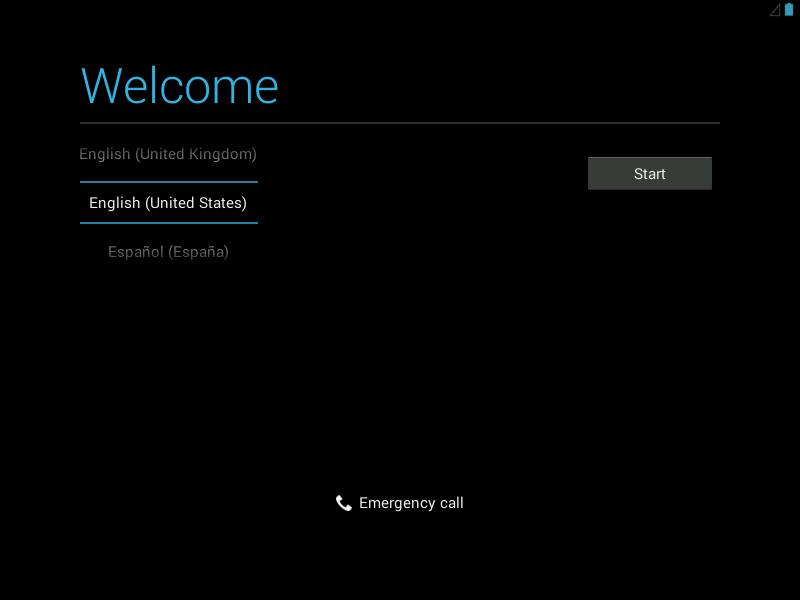
- Step 13: Select your language and enter , now fill in the Gmail details and all the details that are asked .
- Step 14: Now We have successfully installed Android 4.3 on your windows computer .
I have tried my best to explain the process very precisely . Download the required files and try installing android 4.3 on your windows computer and do post your comments .
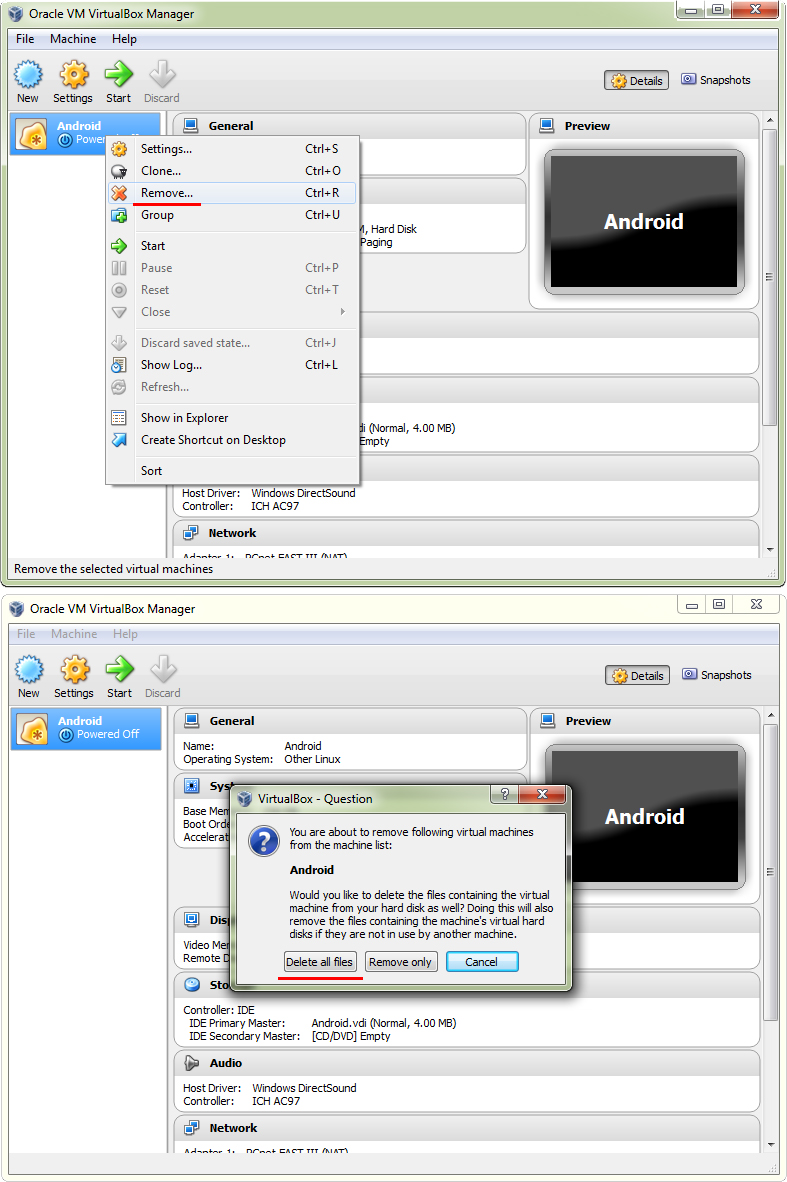
In case you want to uninstall the android 4.3 virtual box, simply right click on the virtual machine and select remove. next select “delete all files” to remove Android 4.3 completely from your PC. Take a look at the screenshots attached for help.
Can I run android apps with this?
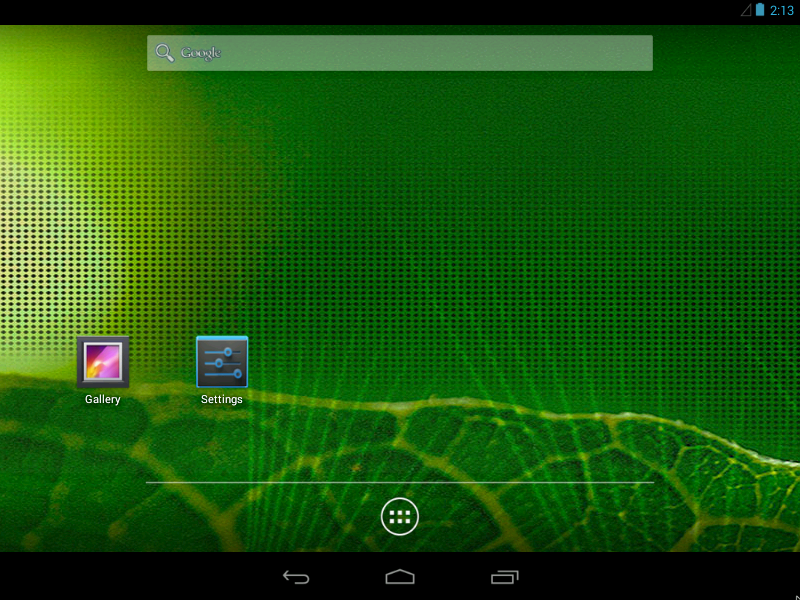
Yes you can , you can download and install android apps from the Google play store itself .
I can’t figure out step 7. After selecting “Install Android-x86 to harddisk”, it goes back to this.. Btw, Thank you so much. 🙂
Strange , it should not come back to this screen . Try creating the virtual machine again . otherwise Try selecting the ” Run Android without installation ” , it would run android 4.3 as a live OS , but it wont save any data .
I can’t still make it work. I tried creating another virtual machine and both tried to run android without installation and with installation but it only goes back to that screen. I’m using Windows 8.1.
I guess the problem is that my notebook has only 2gigabyte of RAM and only 1.48 of it is usable.
Even it should work with a minimum 512 Ram , did you check the live CD/DVD button ?
I can’t make it work. I’ve tried everything. :/
I had the same error, but used a different .iso. Since I was using a Lenovo Thinkpad, I used “android-x86-4.0-r1-thinkpad.iso” instead of “android-x86-4.3-20130725.iso” and it worked.
how to stop auto rotating apps..
i tried to search setting>display > nothing there about rotation…
how to transfer files from computer to android device ?
Remove the iso from virtualmachine
In step 4 you mentioned create a .vdi image but u r using .vmdk
Actually i am also having same issue so will this fix it… ???
Hi Bibhu, this was just a quick setup i did to show the settings to Xander. But you need to create a VDI image. did you take a look at the video demonstration?
ok
I m not able to make it work any way..
help
how to stop auto rotating apps..
i tried to search setting>display > nothing there about rotation…
how to transfer files from computer to android device ?
how to change the screen orientation..whenever i start a game it rotates the screen
Settings/Display/Auto Rotate Screen–Uncheck
There’s also an App for this.
Installed successfully but not get my Mouse Pointer
you can press the”Ctrl” key to toggle off the mouse button and next click inside the android 4.3 virtualbox windows . This way the mouse pointer would be usable inside the virtual box.
make sure you are out of the Virtualbox, go to machine klik the Disable Mouse Integration now back to virtualbox you should have your Mouse pointer now…
Please help..
When i completed the above process started the machine.And clicked on Installation -install android x86 on harddisk a cmd type came and its last line was ALSA devices list
No souncards found .
And it restarts ,
can u plz tell how do i fix dis???
Try updating the drivers for your sound card. I hope that will solve this issue for you.
Thanxx for helping .I Will try this also…
This did not help
same issue still there… 🙁
can i play windows files
You forgot to mention that some computers has Vanderpool or Intel Virtualization by default in the BIOS. They need to enable it first to install android OS.
Thank you Crash, i have updated the post.
Thank you very much for your excellent instructions; I truly appreciate it. If on the other hand I want to uninstall it (along with the partition and whatnot) would that be a problem? Please advise.
To uninstall it, simply right click on the virtual machine and select remove. next select “delete all files” to remove Android 4.3 completely from your PC. Take a look at the screenshots attached for help.
Thank you for your instructions for both installing & uninstalling Android 4.3; you certainly make something very difficult into something very easy & doable. Let me say you are a genuinely nice helpful person; I wish there are more people like you out there. Much obliged.
can we install multipe os in single virtual machine
Yes you can.
You can create multiple virtual machines using virtualbox.
how to connect internet connection?? i’m using cable net…plzz reply saap and how to istall apps if net connectionm is not there??
No internet/wifi please help
Hi Sir,
I have successfully Installed This, but Whatsapp is not Availabt for this Version!!!
Help me to install whatsapp! and other apps! Also ther is a Goodle play error!!!
It does not update google play!
dis OS in virtual box is very laggy how to solve dis problem????
Try allocating more ram.
Thanks very much for this!
I tried this, and it’s just repeating the ANDROID logo over and over.
it finally came up after restarting it. “Unfortunately, Google play services has stopped” message comes up quite frequently.
I am Good with this, only need a solution on how to stop some applications rotating.
Settings/Display/Auto Rotate Screen–Uncheck
There’s also an App for this.
cant complete the 10th step please help
Click on New and then primary. After that follow the instructions from step 10.
Does this work with touchscreen laptops? And does it function like a normal android tab? is root in possible? (P.S. when I say function like a normal android tab, I mean all my Apps, internet connection, Google account, etc.etc.etc.)
please help i can not delete the partition on RAM. after i uninstall it also . what to do . please help.. i lost 500 mb ram size. 🙁
There is no way virtualbox will ever occupy any of your ram space. It only occupies space on your hard disk. Did you uninstall virtualbox before removing the android installation?
hey how do you connect to internet the vm is connected through nat but android is not showing any internet plz help
If you are connected to the internet through a wired internet connection, virtual box will automatically detect it. if it doesn’t then try installing the latest LAN drivers.
after starting it it is first showing the blue screen and then when i select the last option on the blue screen after that the black screen appears… what to do? plz help me fast
Hi Rahul, Please try the Virtual box forums for help ; https://forums.virtualbox.org/viewforum.php?f=6
thanks buddy…
wifi is not workin for me help me bro
Since i made this guide using an broadband connection, i cant help you with WiFi problems. Check the Virtualbox forums for more support: https://forums.virtualbox.org/viewforum.php?f=6
I have windows 8 64 bit. can i install it, because u had mentioned x86.
as far as virtual machine is concerned it should install. but i want to confirm b4 installting it.
thanks
There is nothing to worry, this guide would work fine on Windows 8.
yes, i installed this. but i installed many apps, which failed to load. error
all important apps like whatsapp, SKype line, fringe etc showing not compatible, i installed successfully many games but not a single of them run. just blinking
i have installed this, everything goes fair, but every time when i START andoird system on virtual box it intalls again and again, what to do do? plz help
after i click installation – install android-86x to harddisk..it show this..please help
Hi, have you fixed this issue yet? Even i am facing the same problem.
Thanks in advance!
this is a virtual box bug here’s the fix that worked for me:
http://forums.gentoo.org/viewtopic-p-7518846.html
i m facing the same problem but i can’t fix it.. plz help me out..
Hi i have install android-86x to harddisk.but not boots now in android-86x to is there any solutions for this .please help me
Please head over to the Virualbox forums for support: https://forums.virtualbox.org/viewforum.php?f=6
android not boots as shown below please help
android not booting please help me to solve this problem
android not booting please help me to solve this problem how long it takes to boot please advice thanks
Hi peter, please head over to the Virualbox forums for support: https://forums.virtualbox.org/viewforum.php?f=6
Hello sir, at last i got it. can please tell me now how to rotate screen / display i tried to search in setting but i could find presently my display rotated so i want to bring to normal screen, thanks
Go to Settings>Display>Auto Rotate Screen and Uncheck it. This will disable the auto screen rotation.
hello sir thanks for help. my gallery apps is not opening . message i.e gallery unfortunately stops . i installed another apps but same message. for time i installed android it used to open. any apps available in plays store to solve this problem.
[ 1.067220]Kernel panic – not synsing: Attempted to kill the idle task
Help??
great job, thank you very much.
please help …..
I’ve already installed and installed applications youwave speech to text, but when I run the app speech to text her microphone did not connect.
please tutorial and thank you for that please help
I installed it successfully but mouse is not working. I’m using TAB but it too failed to work in many cases
Help me
Thanks
Go to machine click the Disable Mouse Integration, now back to virtualbox you should have your Mouse pointer now.
That’s great, it worked fine. when ever i start the virtual machine, it is showing me 4 options at start and i select “run android without installation” and everytime it is asking me to setup everything like Google account, language etc
Is it normal or is their any way to setup only once
Thanks
You need to go back to virtualbox and remove check mark for live cd and remove the location of the android that was installed after you complete the installation . This will remove the continuous wanting to install android again and will give you a login screen for android
I did successfully till to the step 7 and i got a window asking installation,live cd blah blah and i chose installation then i got a window as the image(i’ve attached) and stops and then restarts…so i did the same process and happened the same thing….some times it comes to step 8 but i am unable to do anything there..controls dont work and it also restarted after 2-3 mins..plz help anyone…………… (i’m not good in english)
Can i skip step 8 until 12?
Or can i open it if i install it on my hardware (flashdisk) , then i open it on my laptop?
Hi Mashita, if you need to install the virtual machine on a flash disk ( USB flash drive? ), then you will have to create a virtual drive on a USB flash drive in step 5. After that you can follow all the steps till the last one and you should be able to run android 4.3 on virtualbox.
How do I access files in my hard drive from inside the android OS?
I have a few apk’s which i would like to install, how do I do that?
how to shut down and use the pc Files in my drive
hello, i downloaded and installed on my pc, every thing is fine and awesome but i cant see my mouse pointer when i take it to my tablet, it surely works but it gets hidden under tab. any solution?
i fixed i fixed the pointer one.. 😀 noe i can see my mouse on tab. thanks any way
how to downlod whatsaap masengar
bhai how to download Oracle Virtualbox
bro how to download
The latest Android 4.3 image from Android-X86
Here’s the link to download the ISO image for android 4.3 : https://code.google.com/p/android-x86/downloads/list
Thankyou bhai…..but bhai hum android app use kr skte hna ….ismai
You can download oracle virtualbox from this link: https://www.virtualbox.org/wiki/Downloads
Not available for Virtual PC huh?
Hi there, is it possible to cheat the location of the device?, since to the play store I am in europe and don’t let me install an app, because I’m not in USA
cannot download android image as the website is stuck in security image loop. Any alternative?
can i install on windows7 64bit
Yes you can.
ya but i think its not stable
bcs x86 image file
I have personally installed android 4.3 using virtualbox on my PC and it was stable. However since android 4.4 is already out, you should try following our new guide on installing android 4.4 KitKat in a virtual machine using virtualbox. Here’s the link to the guide: http://45.79.42.225/install-android-4-4-kitkat-windows-virtualbox/
when i trying to download image file its asking too much captcha
That’s a known problem, you should try downloading the file after a few hours.
but how i can burn this zip file on dvd
You don’t need to burn the ISO file into a DVD, simply follow the detailed instructions provided above. Also watch the YouTube video for any help.
please explain me bcs there 3 image files when i trying to burn it showing invalid image file
how can I access the internet, adding music, pictures or videos to that android PC?
it work so laggy and slow any solution plz reply>>>>> 🙂
which virtual box i need to download? i m on window 8 32 bit
VirtualBox 4.3.14 for Windows hosts x86/amd64
VirtualBox 4.3.14 for OS X hosts x86/amd64
VirtualBox 4.3.14 for Linux hosts
VirtualBox 4.3.14 for Solaris hosts
As you are using Windows 8, then its ok to download VirtualBox 4.3.14 for Windows hosts x86/amd64 for your machine. rest of the guide will be same
I am getting an error message (in the following link) while trying to start my Virtual Machine that is in Step 9
http://pastebin.com/apuGxNxy
umm, i have some problem here, after installing process is done, and reboot
then it say ” Fast TSC Calibration Failed” ,
what does that mean ?
Virtual Box doesnt work, why? it hangs up when i opened it.
Dear Lovejeet, thank you very much for a neat tutorial. It is working great! Earlier I was using Bluestacks but had many issues. Now with Virtual Box all those issues are gone! I have a request, in your instruction set please mention following :
1. Use right control key on your keyboard to toggle mouse On/OFF.
2. You need to go back to virtualbox and remove check mark for live cd and remove the location of the android that was installed after you complete the installation . This will remove the continuous wanting to install android again and will give you a login screen for android
Thanks once again!
Thank you Abhijit, i will definitely add them to this post.
Hi, please let me know if I can drag and drop files from my computer to whatsapp? Also how can I send the files from whatsapp to my computer?
Thanks
Settings>Display>Auto Rotate Screen – not such option is there to stop auto rotate..Please advice
When i select intall android -x86 to hardisk it opens next window and again and again open that window to “install android -x86 to hardisk”.
Please help me in this error
I finished installation and after i runed android show me a black screen with ANDROID text with blue color.. and android dont start…
please help everything went perfect but the wifi doesnt want to go on…how do i do to have internet on the virtual android
i got stocked at formatting partition sda1 it does not start. please help. 🙁
hi…and thanks for the guide but can you help me how i can change my display thats because i broke my laptop screen so now i am using another pc monitor….and it is just staying black,i kept it on for around 7 hours…..is there any debuging code for that so that i can switch that pc monitor as a primary monitor and could you plz help me out with this as soon as possible….,,,plzzzzz it’s urgent…thanks
You are a idiot kill yourself
I can not control the Virtual Android with my mouse.
I can not rotate the Virtual interface to vertical view.
I did get it to work, but the app which I am doing it for (farmville 2 country escape), says it’s not compatible with my device. Which is strange, because I have tablet with Android 4.2.2 and it is working on that device. Shouldn’t it be working on 4.3 as well?
Would you be able to “root” the virtual device and flash a custom rom, if so how would you boot into recovery
Android installed through VM virtual box but one problem my PC my HDD not formats to ext3 please solve this problems
When i run imo and call.. It says unfortunately stop. Why
hello,can I call a phone through the emulator?
hi, I get to #8 and get mssge ” no bootable medium found system halted. what now? help pls
and how the hell we use mouse ? :))
almost all aplications and games,are incompatibile with this device…
Sorry does not work in either Oracle Vbox, or Vmware, no network detected and immediately asks for a wifi connection.
I tried it in Oracle VirtualBox (current version) using NAT and Bridged, I also tried it in VMware player using the same setup, both NAT and bridged, and neither of them work.
I even tried the Android image files 4.2 and 4.3 and neither of them work, they get as far as ‘Welcome,,,, Please wait………………….’ and that’s it no further, it’s looking for a network connection and it seems it can’t find one even though ‘Cable Connected’ is enabled, and tried on both NAT and bridged.
Looks like it’s back to the drawing board huh?
Mouse does not show up in the installed android – what to do?
i cant understand step 6